“From Code to Production: A Step-by-Step Journey”.
Curious about how code makes its way to production? Here’s a glimpse into the typical workflow:
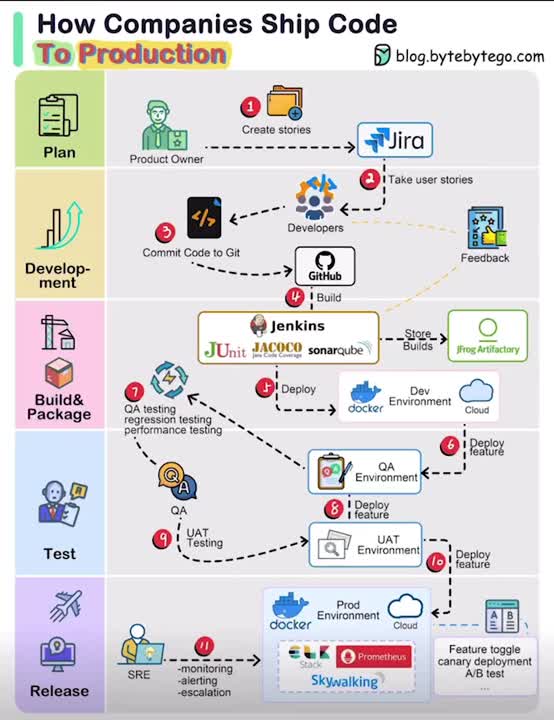
1. Product Vision: The process begins with the product owner crafting user stories based on requirements.
2. Sprint Development: The development team selects these user stories from the backlog and incorporates them into a sprint for a two-week development cycle.
3. Code Commit: Developers commit their code to the Git repository.
4. Build Automation: Jenkins triggers a build, which must pass unit tests, code coverage thresholds, and quality gates in SonarQube.
5. Artifact Management: Upon a successful build, the artifact is stored in Artifactory and deployed to the development environment.
6. Feature Testing: With multiple dev teams working on various features, each feature is deployed to QA1 and QA2 for independent testing.
7. QA Assurance: The QA team performs QA testing, regression testing, and performance testing on the new environments.
8. UAT Deployment: Following successful QA testing, the builds are deployed to the UAT environment.
9. Release Candidate: If UAT is successful, the builds are marked as release candidates and scheduled for deployment to the production environment.
10. Production Monitoring: The SRE (Site Reliability Engineering) team takes charge of monitoring the production environment.
Want to learn more about web development?
Follow JavaScript Mastery GeeksforGeeks freeCodeCamp Scribbler.Live and for system design and devops follow ByteByteGo
Credits: ByteByteGo
ترجمه:
“از کد تا تولید: سفری گام به گام”
کنجکاو هستید که چگونه کد راه خود را به سمت تولید باز می کند؟ در اینجا نگاهی اجمالی به گردش کار معمولی است:
1. چشم انداز محصول: این فرآیند با ایجاد داستان های کاربر بر اساس نیازهای صاحب محصول آغاز می شود.
2. توسعه Sprint: تیم توسعه این داستان های کاربر را از بک لاگ انتخاب می کند و آنها را برای یک چرخه توسعه دو هفته ای در یک اسپرینت ترکیب می کند.
3. Code Commit: توسعه دهندگان کد خود را به مخزن Git متعهد می کنند.
4. Build Automation: Jenkins یک ساخت را راه اندازی می کند، که باید تست های واحد، آستانه پوشش کد و گیت های با کیفیت را در SonarQube پشت سر بگذارد.
5. مدیریت مصنوع: پس از ساخت موفق، مصنوع در Artifactory ذخیره می شود و در محیط توسعه مستقر می شود.
6. تست ویژگی: با چندین تیم توسعه دهنده که روی ویژگی های مختلف کار می کنند، هر ویژگی برای آزمایش مستقل در QA1 و QA2 مستقر می شود.
7. تضمین QA: تیم QA تست QA، تست رگرسیون و تست عملکرد را در محیط های جدید انجام می دهد.
8. استقرار UAT: پس از آزمایش موفقیت آمیز QA، بیلدها در محیط UAT مستقر می شوند.
9. Release Candidate: اگر UAT موفقیت آمیز باشد، ساخت ها به عنوان کاندیدهای انتشار علامت گذاری می شوند و برای استقرار در محیط تولید برنامه ریزی می شوند.
10. نظارت بر تولید: تیم SRE (مهندسی قابلیت اطمینان سایت) وظیفه نظارت بر محیط تولید را بر عهده می گیرد.
آیا می خواهید در مورد توسعه وب اطلاعات بیشتری کسب کنید؟
JavaScript Mastery GeeksforGeeks freeCodeCamp Scribbler.Live را دنبال کنید و برای طراحی و توسعه سیستم، ByteByteGo را دنبال کنید
اعتبار: ByteByteGo


